User manual
➡ LOGIN AND REGISTRATION
Click "Log in" or "Try one month free" to use the Smartload app.
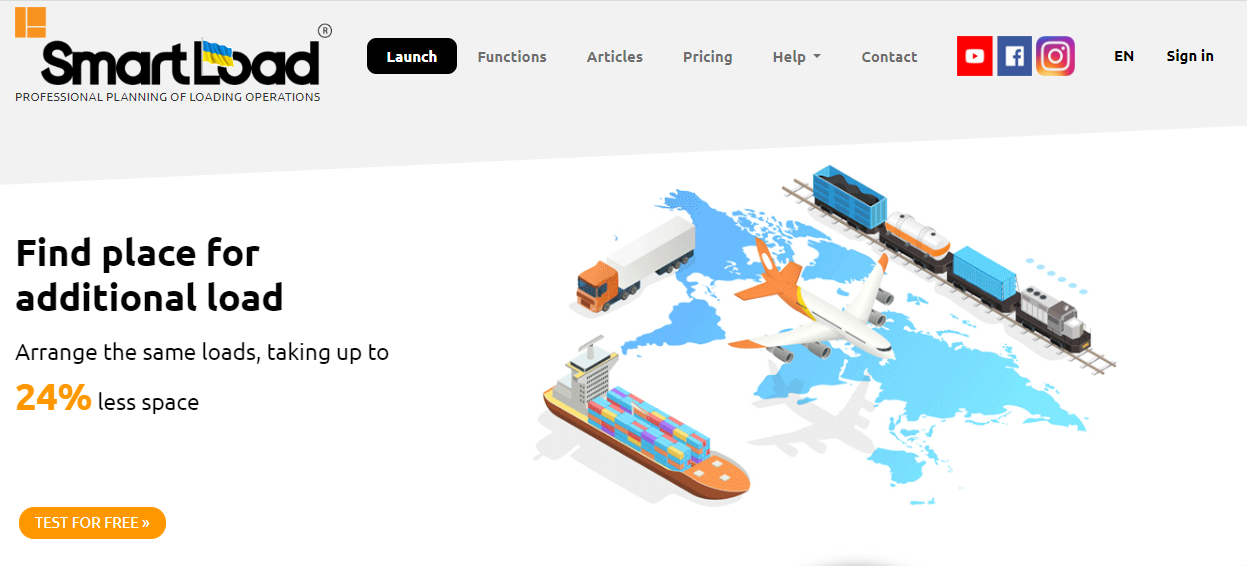
If you don't have an account yet, register using the "Create a new account" button . Then log in by entering the previously set e-mail address and password. You can also choose to sign in with Facebook, Google or Apple.

During registration, after entering the data, you will receive a message with an activation link in your e-mail box. Additionally, an authentication code will be sent to your phone number. After confirming the account and accepting the regulations, you can go to work in the application.
➡ CREATING A NEW PROJECT
1. When logging in for the first time, you will be prompted to select your fleet. If you want to place loads on all available spaces, just check "Save" . However, if you have your own fleet, e.g. only buses and solos, select them and the application will place loads only on selected spaces. Attention! You can modify the fleet at any time by entering the USER PANEL → SETTINGS → SELECT YOUR FLEET .

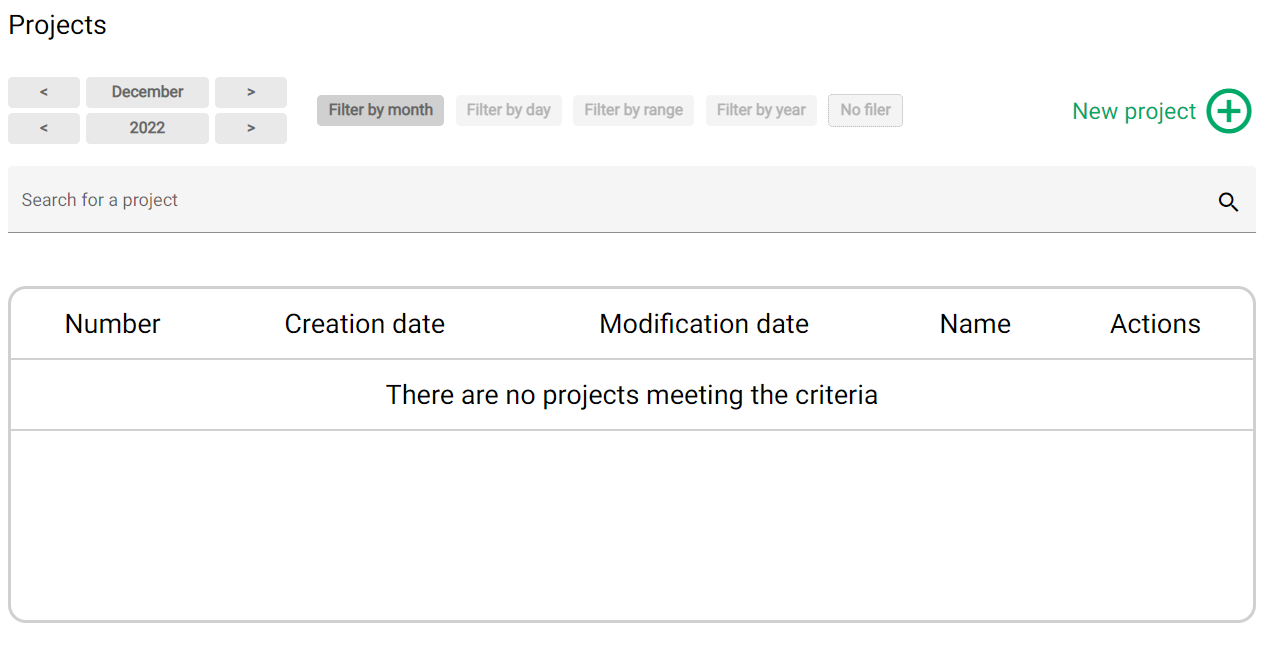
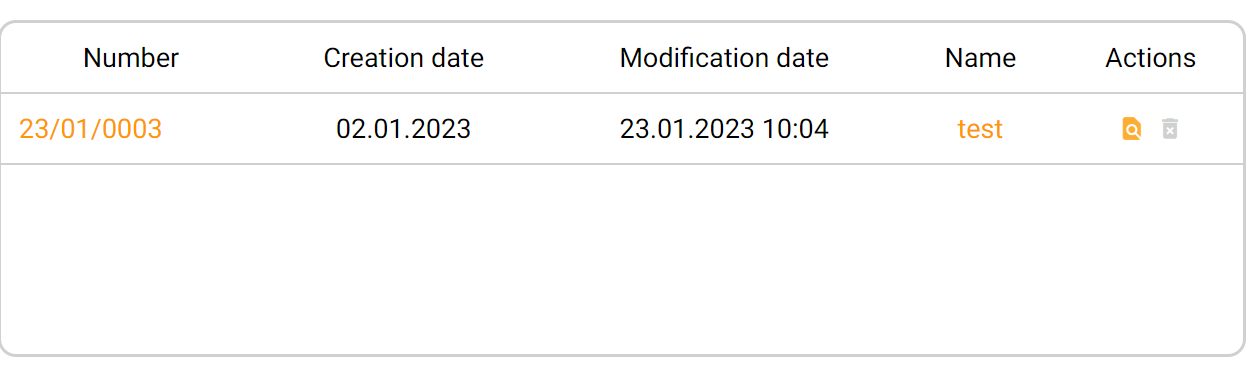
2. Then click "New Project" to start. You can search for projects later using the filters at the top of the page. Projects can be placed in a previously created directory.
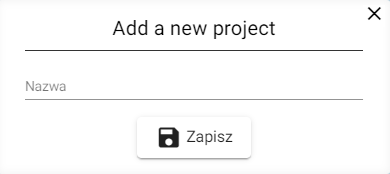
3. Now a window will pop up where you need to enter the name of the new project, add it and then click “Save” .
4. Then click on the selected project to enter it.
➡ CHOICE OF CARGO SPACE
Attention! You can skip this step if you are not sure which cargo space will fit your cargo and go straight to adding cargo. Then the application will choose the appropriate space itself.
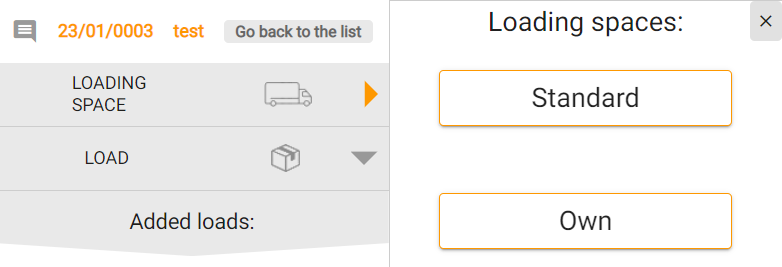
1. To select a loading space, click “Cargo space” and then the vehicle type. You can choose between standard and own vehicles.
2. After clicking on "Typical" vehicles , a list of vehicles with standard dimensions, which appear most often on the transport market, is displayed. Select one of them and then click " Apply spaces" . You can also choose a "Container" and "Pallet" space . After selecting a space, you can also modify its dimensions by clicking on “Adjust space dimensions” .
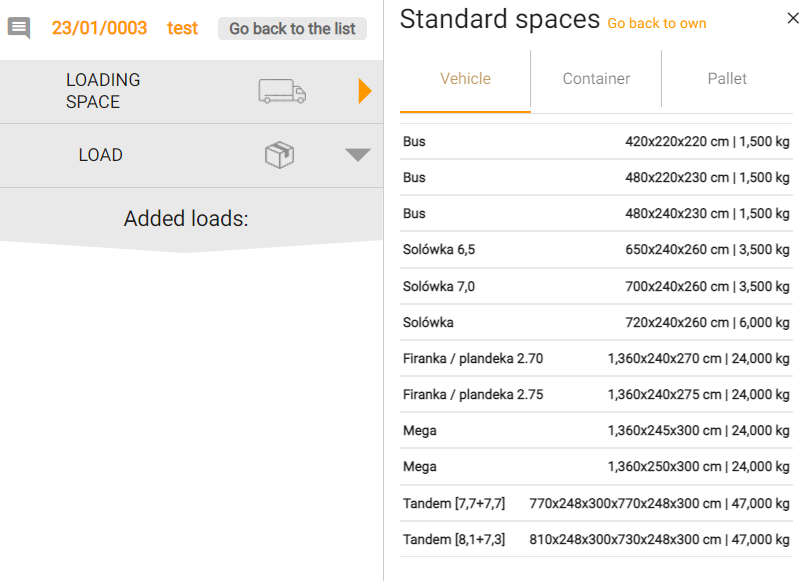
Attention! You can also go to your own loads by clicking on "Go back to own" . In addition, it is possible to quickly add loads by clicking "Load" .
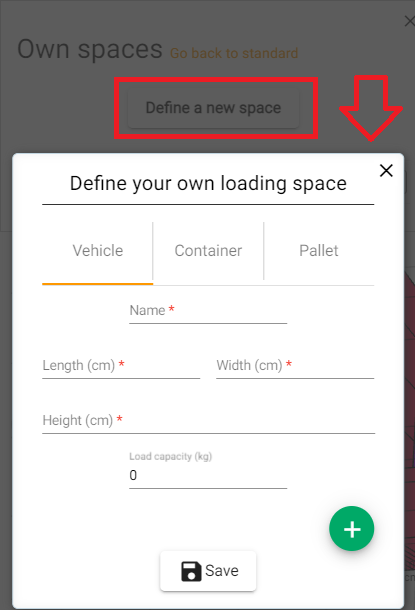
3. You can define any cargo spaces in your own spaces. You can choose from a vehicle, container and pallet. Enter the indicated parameters and then save. You can also add additional cargo space, e.g. a semi-trailer, by clicking the “+” button.
➡ LOAD SPACE MANAGEMENT
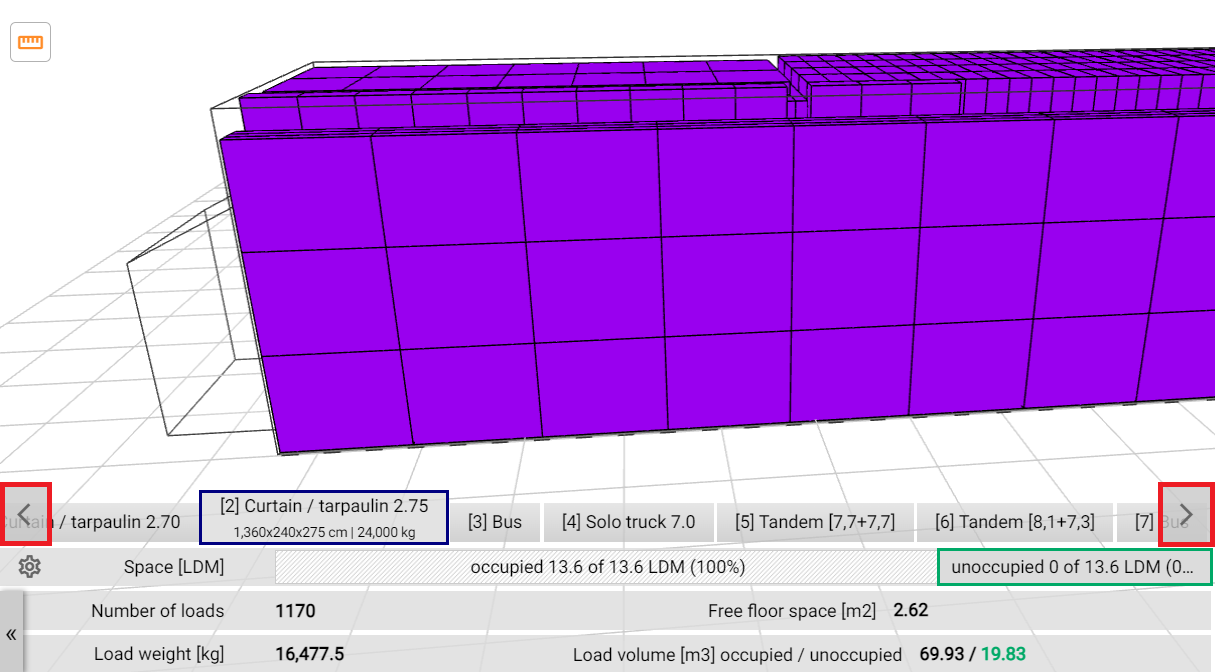
1. After confirming one of the cargo spaces, you can add others in the same way. You can also switch the view between spaces by clicking on their name in the bottom bar. Here you will also see how much space is already occupied and how much free cargo space is left, the number of pallets and the weight of the load.

2. By clicking the pencil icon visible after hovering over the selected tab, you can modify the dimensions of the cargo space.

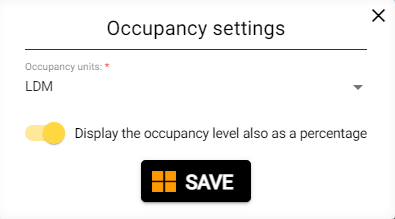
3. By clicking on the cog symbol you can modify the loading space occupancy settings.
4. If you want to hide the cargo space management bar, click on the two arrows on the left side  .
.
➡ LOAD SPACE SETTINGS
1. You can modify the cargo space settings by clicking on the gear symbol in the upper left corner of the screen . ATTENTION! The options presented below should be selected before adding loads. After selecting the option, remember to click "Save" .
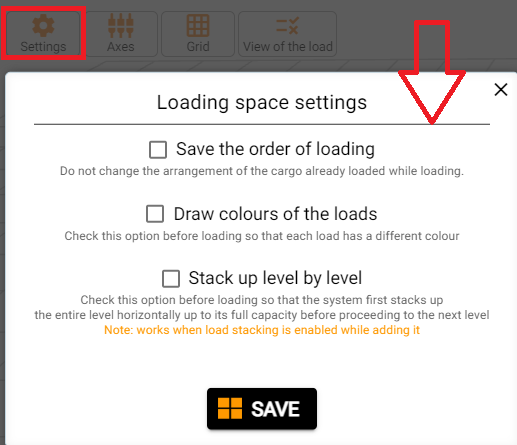
⬜ Save the order of loading - the program will treat the loading order with a higher priority, even at the cost of space optimization. This means that the application does not change the order of the loads, the first added load is at the beginning and the last at the end of the loading space.
⬜ Draw colours of the loads - thanks to this function, each type of load will have a different color. This way you can group your loads.
⬜ Stack up level by level - the branding system will first complete the entire floor horizontally.
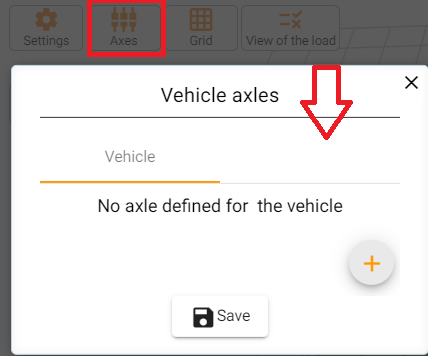
➡ ADDING AN AXLE ON A SEMI-TRAILER
Click on the axle symbol to define their arrangement on the vehicle. Thanks to this, you can control the load on the axles.
1. Click “+” to add an axis.
2. Then enter the distances of each axle from the front of the vehicle and "Save" . To remove an axis, click the trash can symbol, click the “+” symbol to add more.
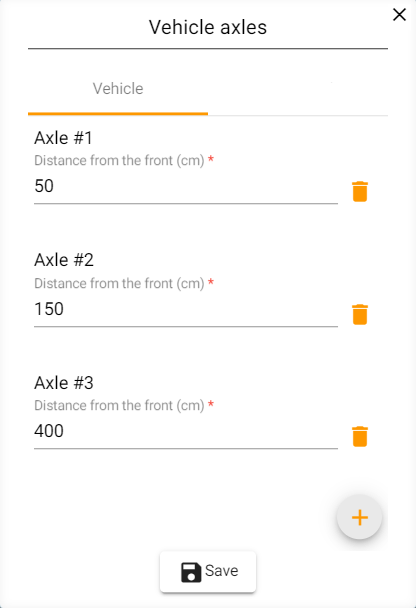
After defining the axles, you will see the axles of the vehicle in the visualization. As loads are added, the pressure will change.
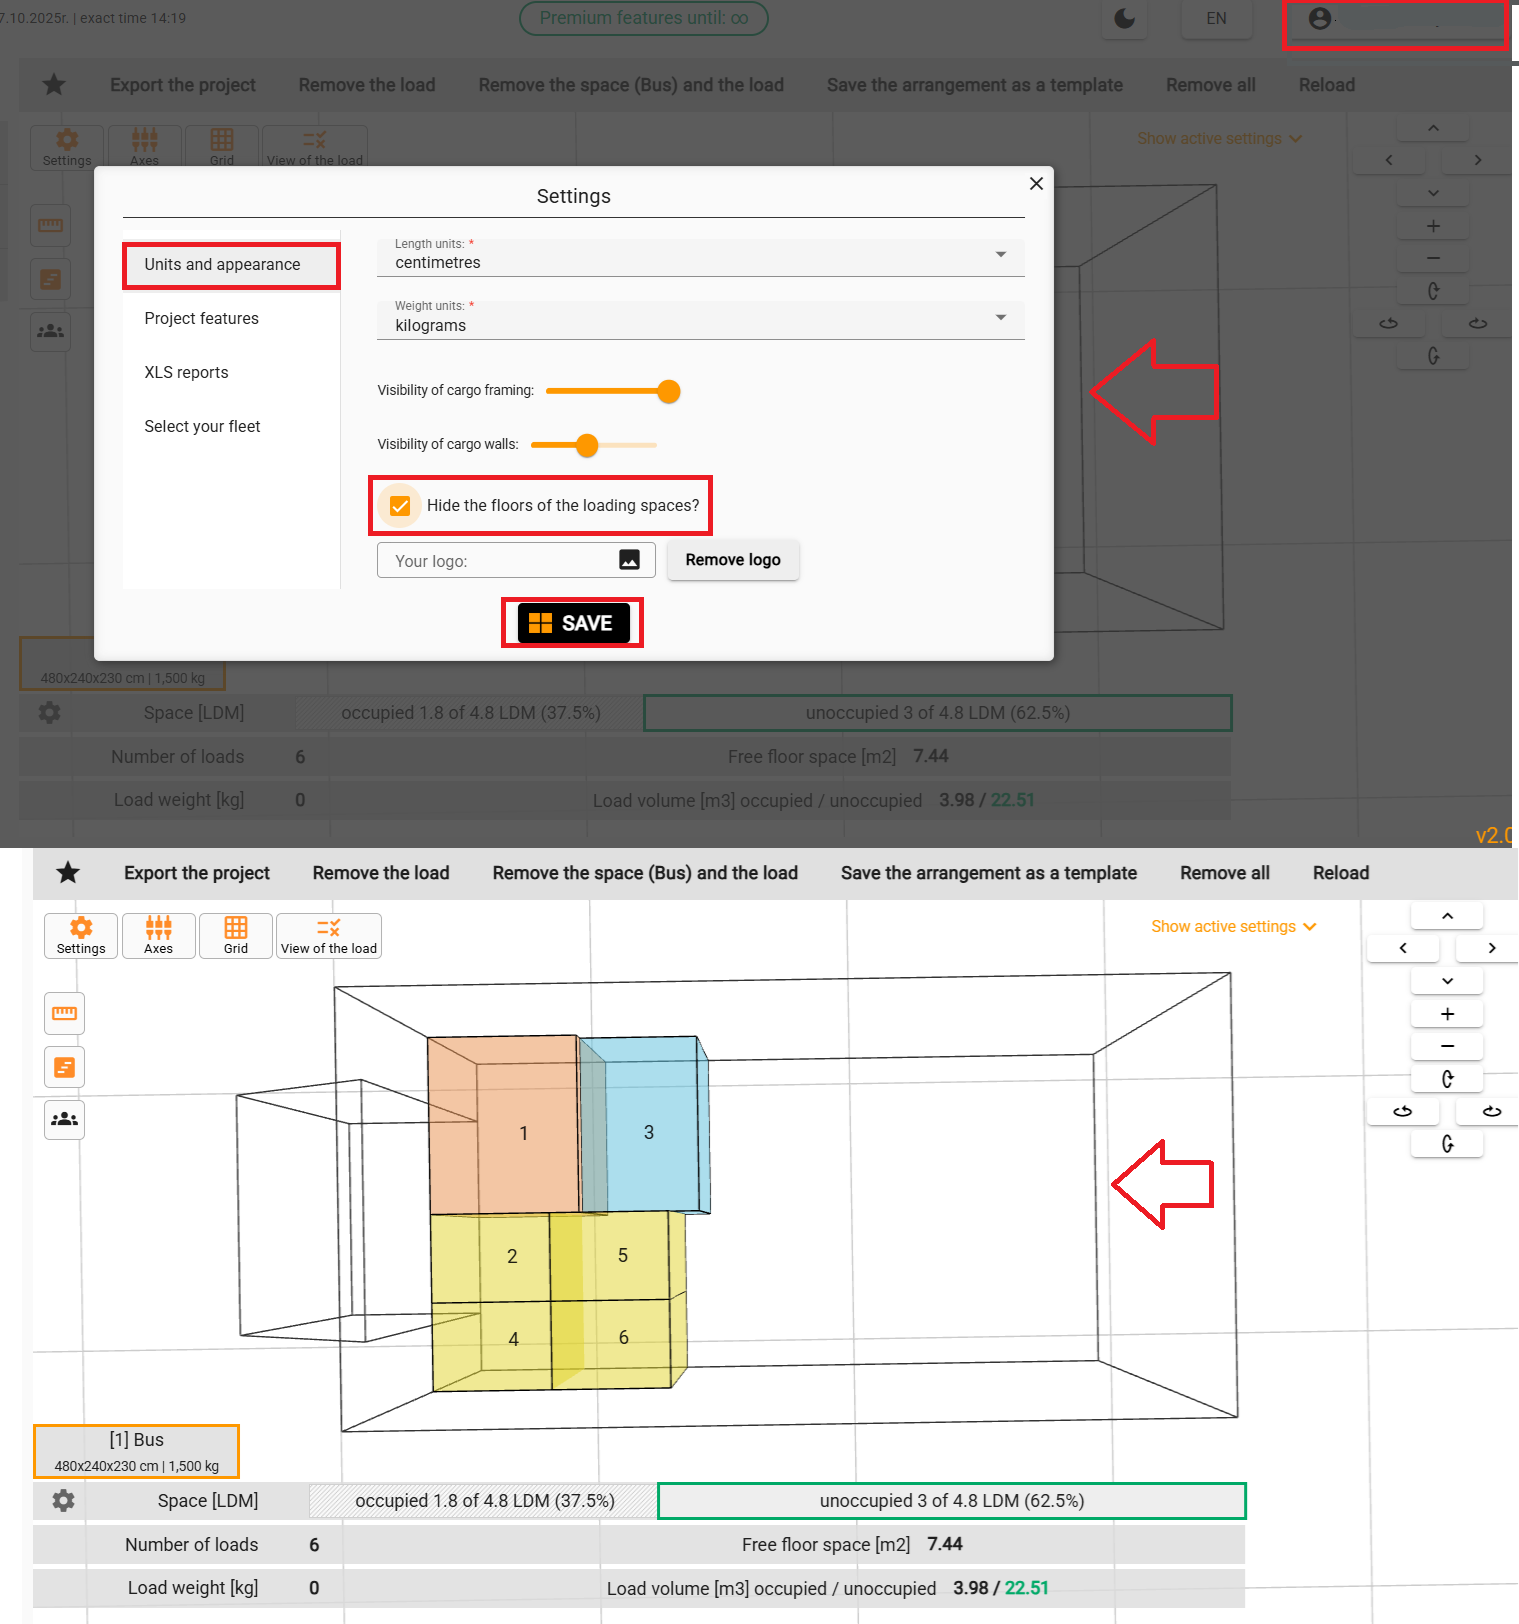
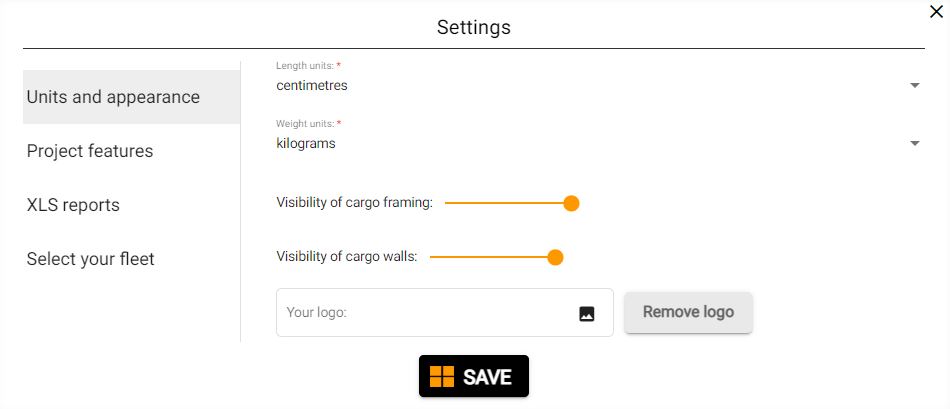
3. Turn off the cargo floor color. Open the Settings menu. Go to the Units and Appearance section. Select the Hide cargo floor option. Click Save to confirm your changes. Tip: This feature is especially useful when printing your cargo design in black and white, as it improves print clarity.
➡ ADDING AND SETTING LOADS
Loads, like cargo spaces, are divided into typical and custom.
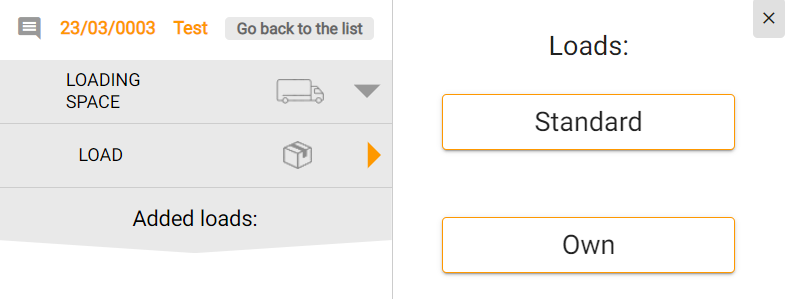
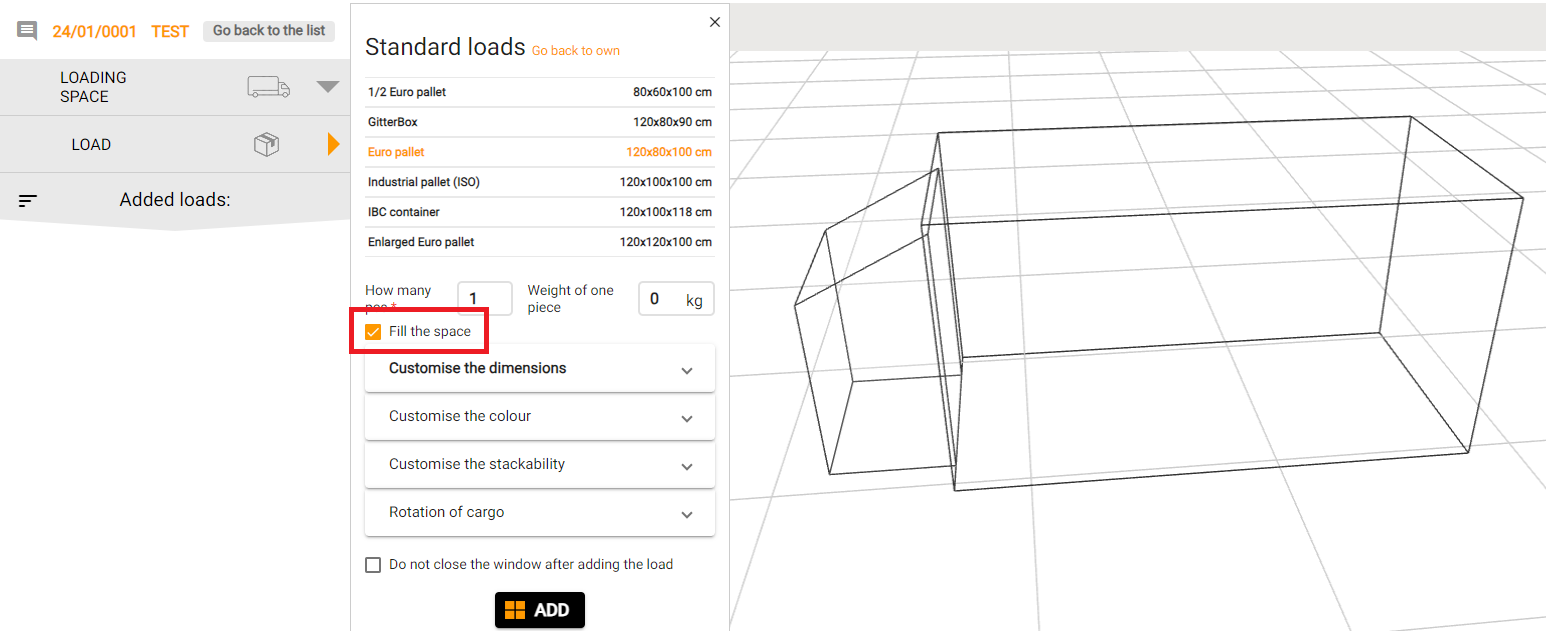
1. Selecting a “Typical” load will bring up a list of standard loads. Click the selected one, then you can modify their parameters. The number of pieces and weight can be entered in the fields below.
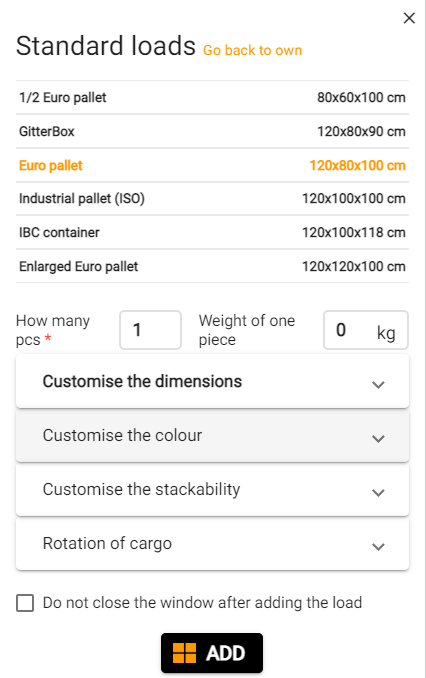
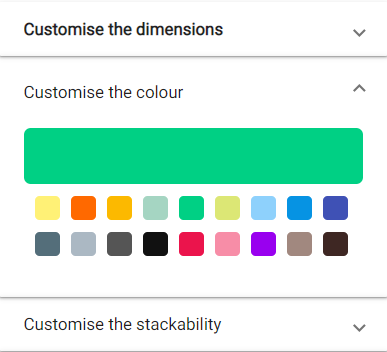
2. Thanks to the “Customize dimensions” tab , you can manually enter the dimensions of your load. The "Customize color" button allows you to mark various types of goods.
3. By clicking "Adjust stackability" you can set the stackability of the load. “Total” stackability means that you can stack other loads under or over the selected pallet (load no. 3). "Active" is one that can be placed on another stackable pallet (Load No. 1). “Passive” is one on which another pallet can be placed (load no. 2).
4. If you select total or active load stackability, additional settings will be displayed:
“Stacking height” enter the stacking height, and use the slider to enable or disable the maximum stack height.
“Adjust protrusion ” use the slider to select how much a load can protrude when stacked above another load so that it does not fall down.
0% - the load must not protrude
40% - the load will fall only when it protrudes more than 40%. Applies to any of the dimensions - length and width.
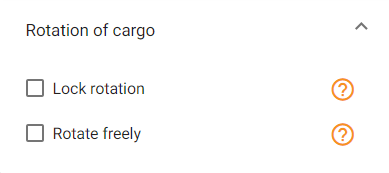
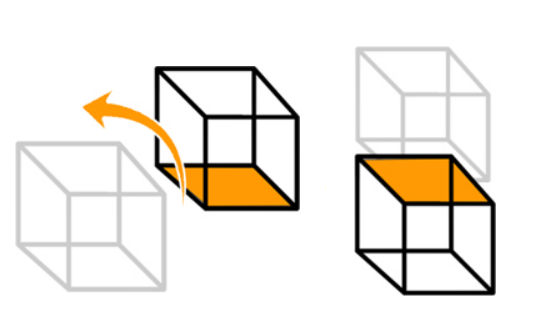
5. Select “Load rotation” and then select one of the available options.
Block stacking - the load will not be rotated in any direction, even if it would allow for better placement. You can use this option if the load needs to be loaded in a specific way, for example sideloading long loads.
Rotate freely - the load will be rotated in any direction, which will allow for optimal arrangement.

5. To add your own custom load, click “Custom” and then choose one of the two options. You can define a new load by entering parameters in the application or import it from a previously created file.

6. Click “Define New” if you want to manually add all loads in the application. Then enter the indicated parameters*, determine the stackability of the load and its possible rotation.
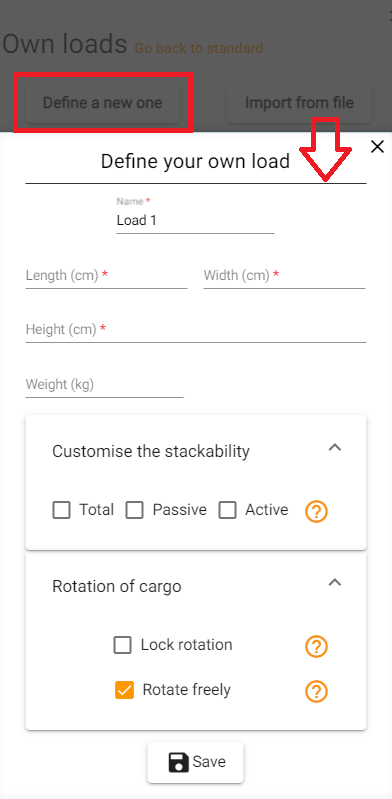
*Currently, entering the name of your own load is not required, if you do not care about giving the name of the load, you can skip this step and the application will name the load itself.
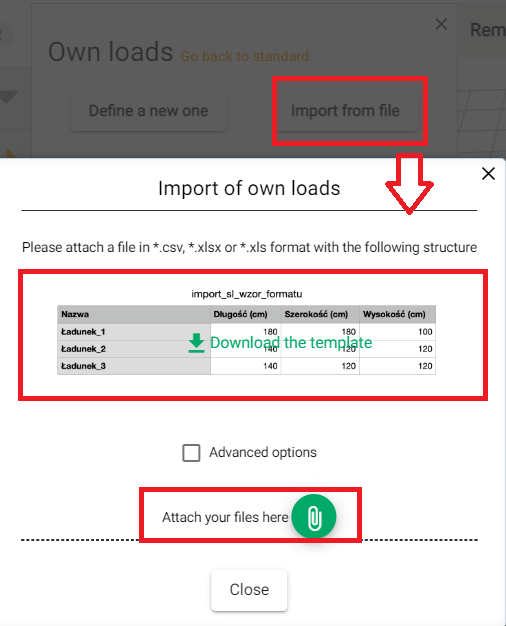
7. You can also import a file with a list of loads that you want to enter into the application. You can download the finished pattern by clicking "Download pattern" and then add it by clicking "Attach files here". To go to stacking loads, click "Close" .
8. After importing the loads, you can modify their parameters. To select all, click the empty box at the top of the list, then you can set the same parameters for all loads. By selecting the selected ones, you will change the quantity or parameters of only a specific load. Then click "Add" and the loads will appear on the visualization.
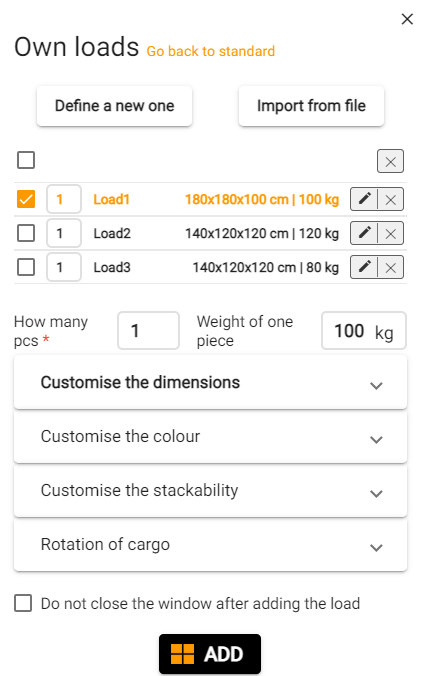
9. By default, after setting all the parameters of the loads (own and typical), they are added to the loading list. Thanks to this, you can add many loads with different parameters to the cargo space at the same time. To disable this, uncheck "Add loads to the loading list".
10. The settings for the visibility of walls and load borders can be found in the User Panel → Settings → Units and appearance .
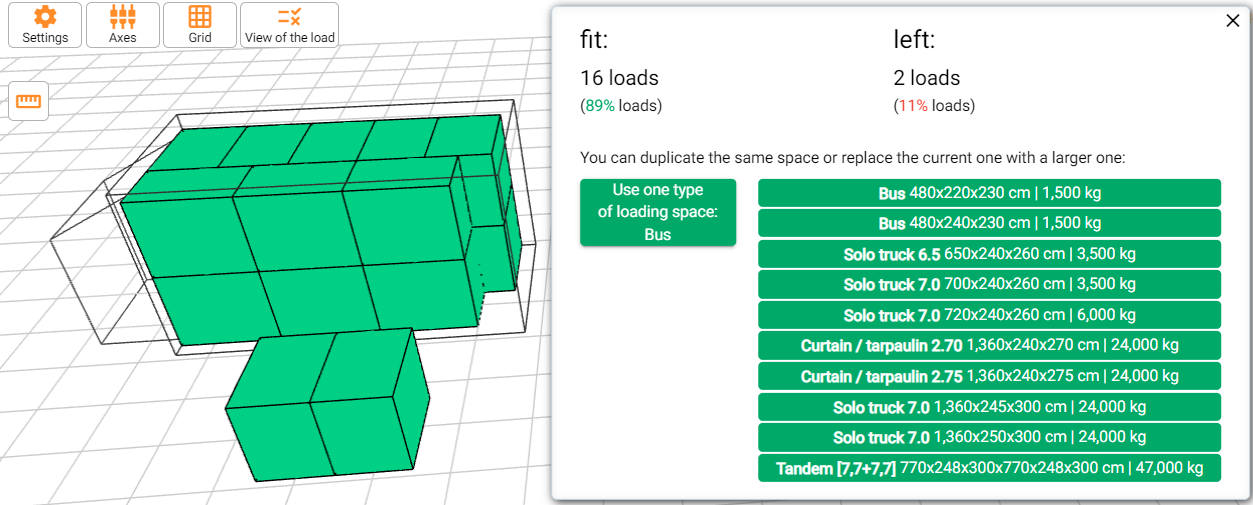
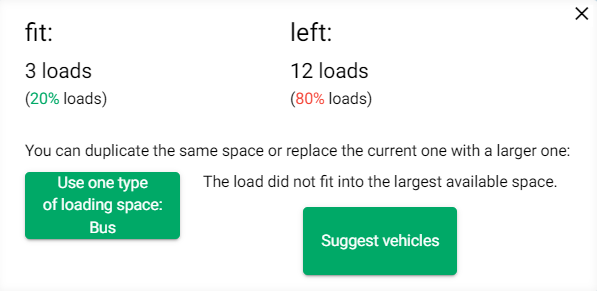
11. If the added loads do not fit in the selected load space, the program will suggest duplicating the load space or selecting a larger space from the list.
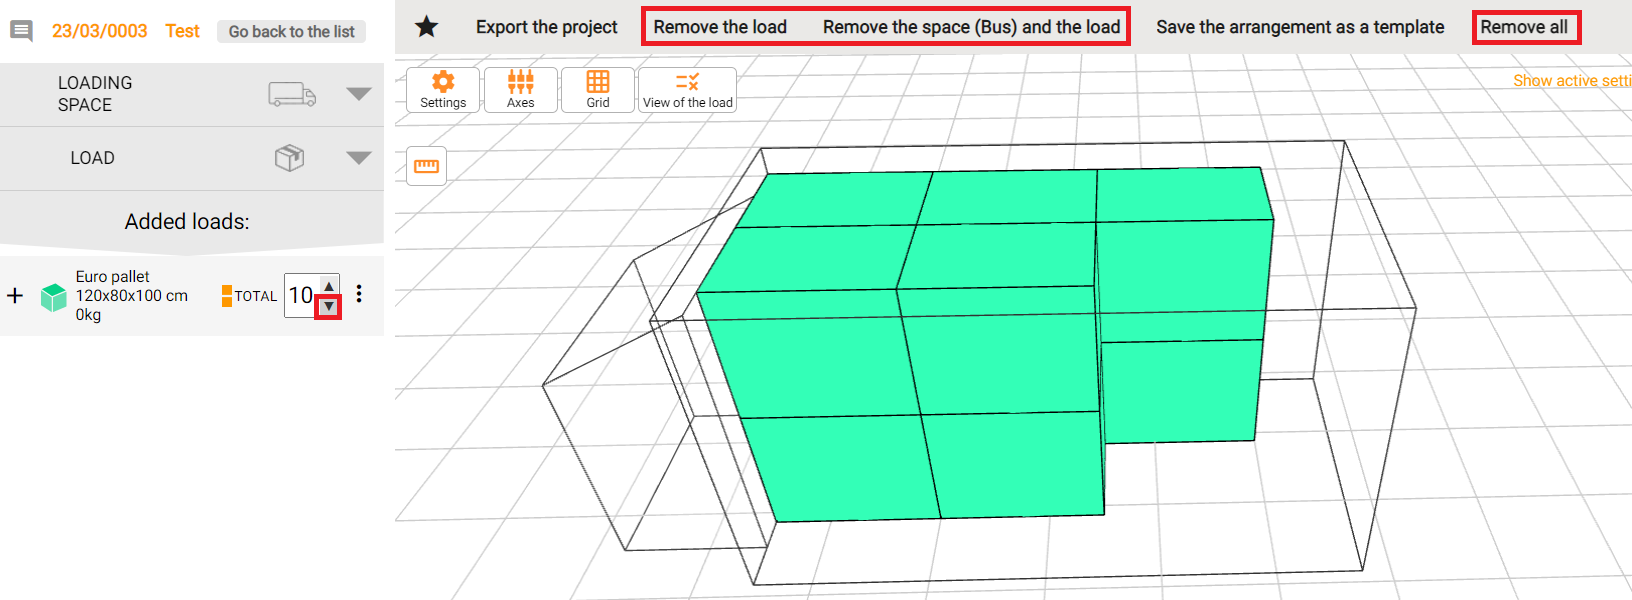
12. Deleting loads and cargo spaces - to remove cargo from the current cargo space, click "Remove cargo". On the other hand, to remove the load with the space, click "Delete space (e.g. BUS) and load". To delete all created spaces, click "Delete All" . You can also reduce or increase quantities using the arrows visible on a specific load.
13. Manual stacking of loads - thanks to the drag & drop function , you can freely place loads. All you have to do is hold down the selected load with the right mouse button and then release it in a convenient place.
*Currently, a maximum of 3,000 loads can be added to the visualization.
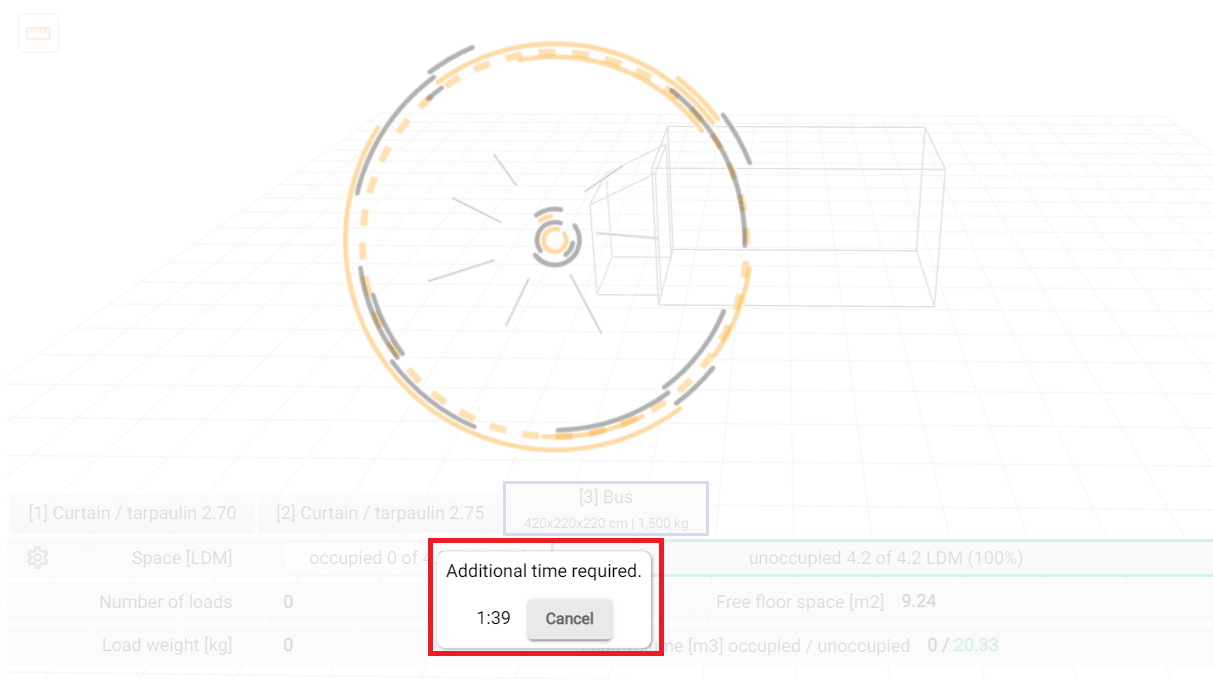
14. Fill the space - new! Check if you want to fill the entire cargo space with the selected cargo. After adding loads, depending on the size of the space, additional time will be required for the application to place the goods.
➡ VISUALIZATION SETTINGS
1. To set load labels, click “Load view” and a list of additional functions will appear. They allow you to describe the load in a convenient way (shown in the picture below).
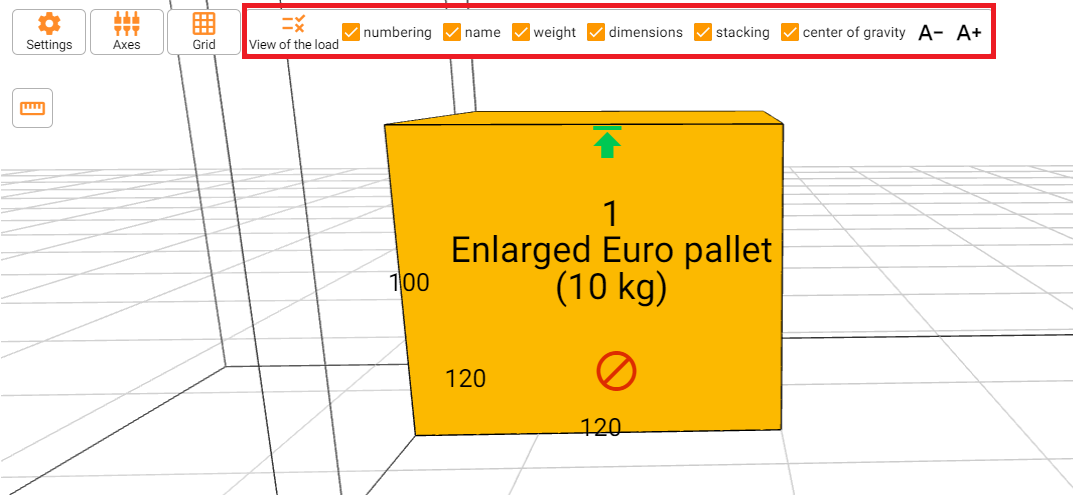
To increase or decrease the font with load parameters, click the symbol A - (decrease) A + (enlarge). You can also mark the center of gravity of the loads.
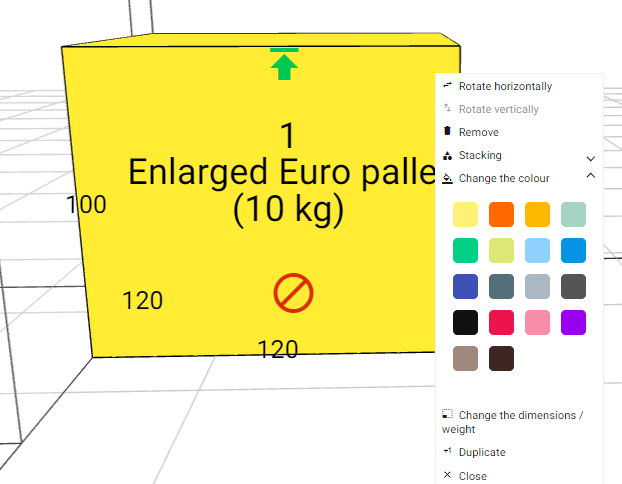
2. You can also edit the load by right-clicking on the selected element.
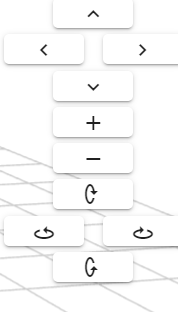
3. To change the view to loading, you can use the control panel or use the mouse to move the view to the visualization.
➡ SHARING YOUR PROJECT WITH OTHER USERS, LOADING STAGES, LOAD FUNCTION
New in Smartload!
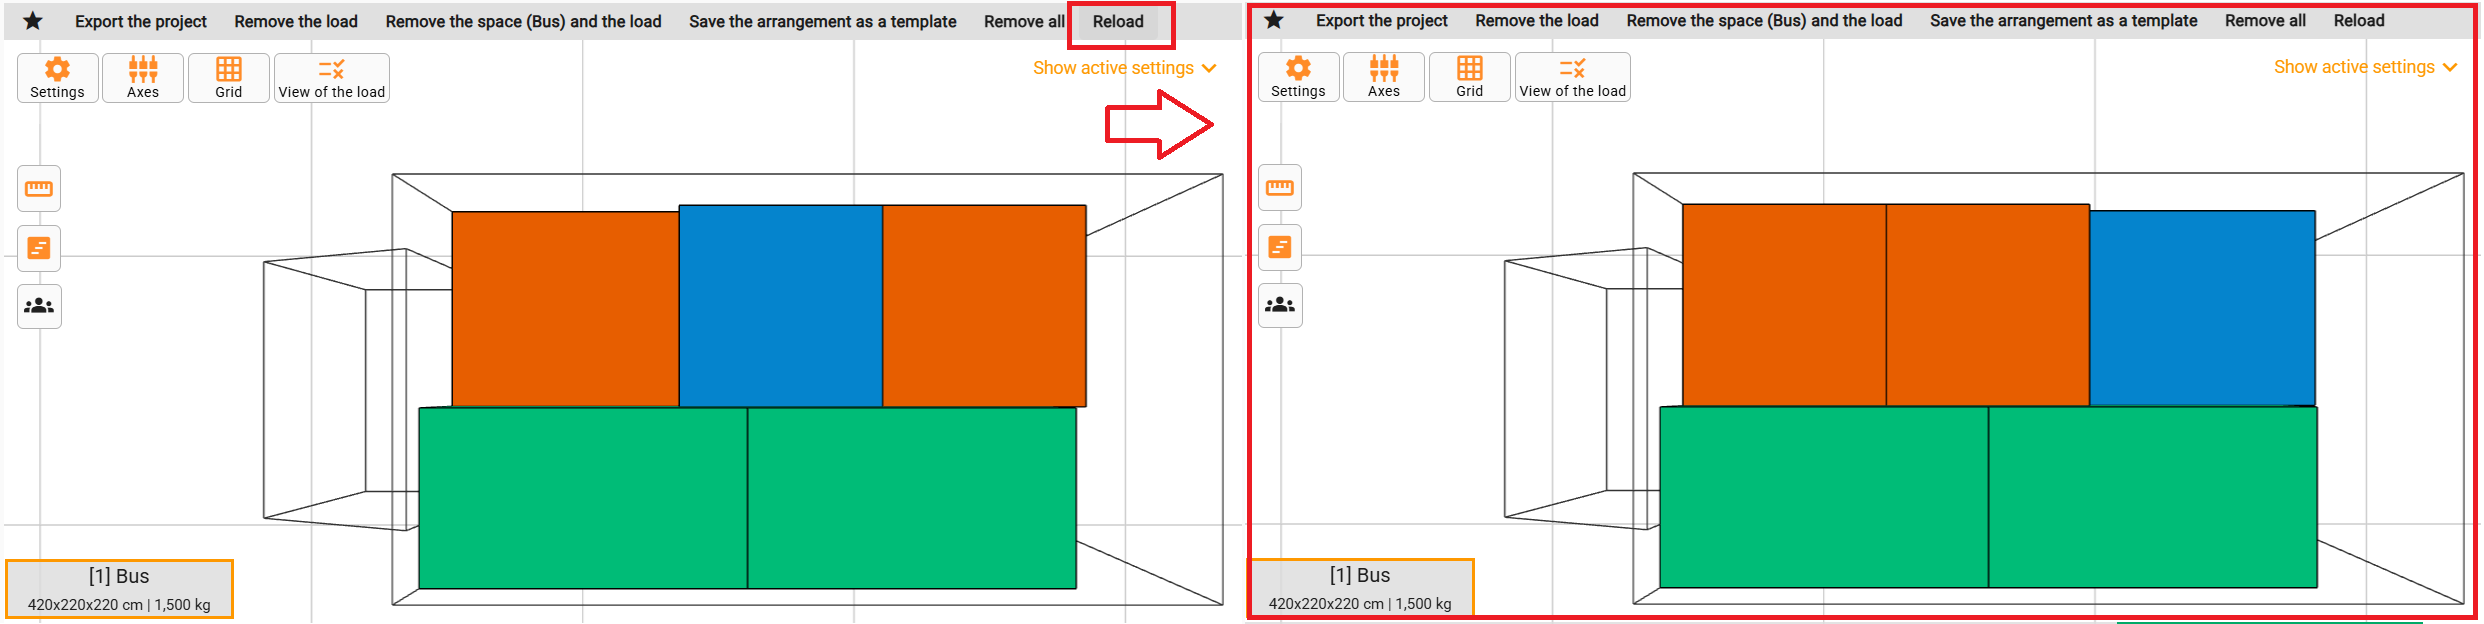
🔶 The "Reload" function allows you to quickly rearrange loads within a selected space without having to create a new project. This flexible solution is especially useful when transport conditions change or logistical assumptions need to be adjusted.
🔶 Project sharing and teamwork - users can now share projects and edit them simultaneously in real time. This feature opens up new possibilities for teams working remotely or in different locations.

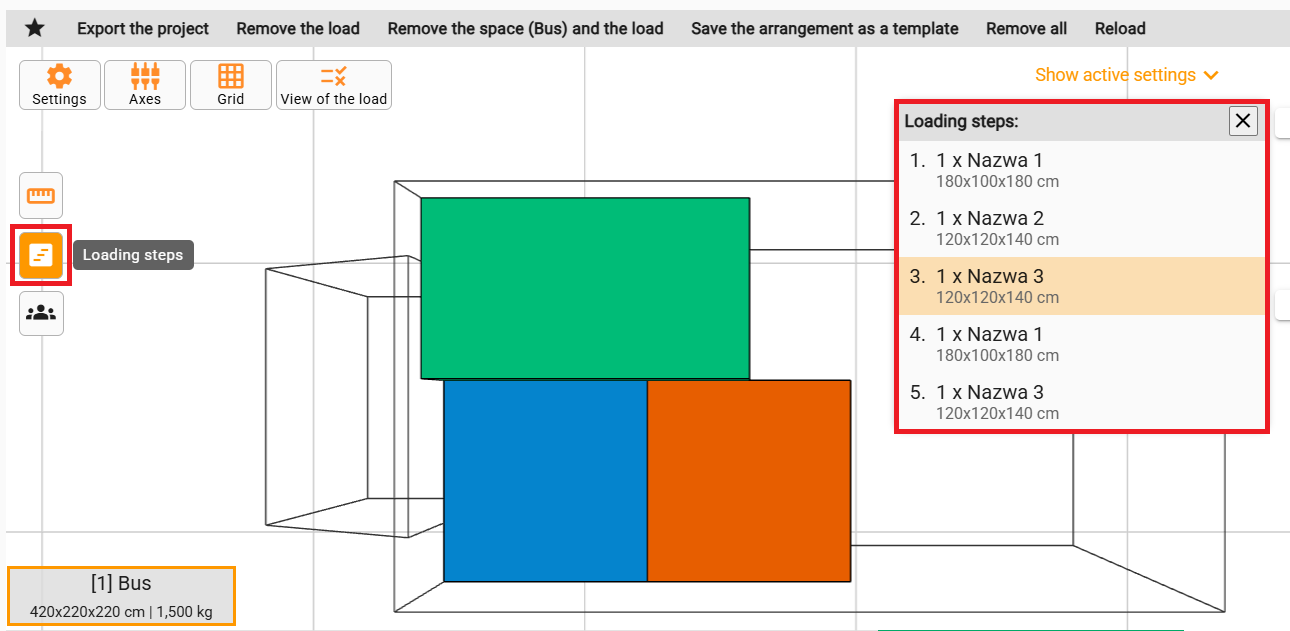
🔶 Displaying loading stages - a new option allows you to visualize subsequent loading steps. This allows for better planning of loading work and providing clear execution instructions.
➡ EDIT VIEW FOR EXPORT, SAVE, SHARE AND DOWNLOAD THE DESIGN
Attention! Before downloading the project, set a convenient loading view. This view will be added to the report. In the same taskbar, you can also find other functions such as deleting or saving a template that will allow you to save the cargo space with loads in "My Garage" (see. User Panel) .
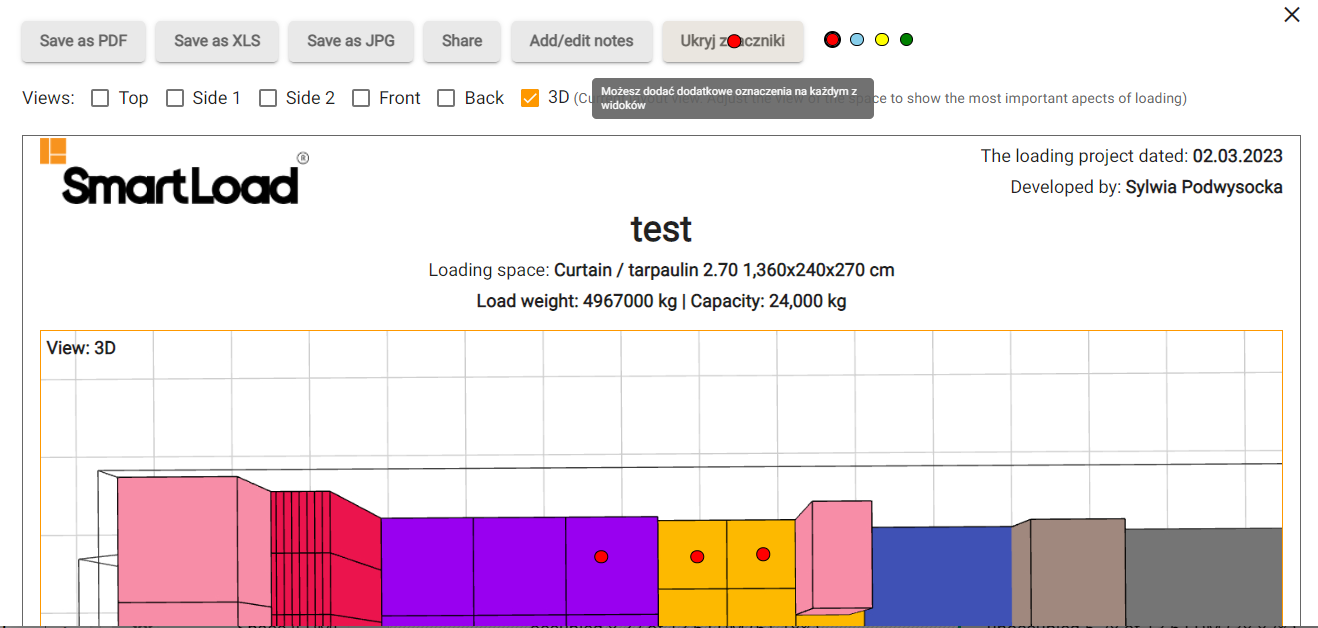
To save the project, click "Export Project" . Then you will see the project export view.
1. Here you can select loading views by ticking or unchecking the selected ones:
2. You can also not download the project but share it in the form of a link.
3. Add or edit design notes.
4. Add or remove tags (additional tags, e.g. load securing). To remove, click on the previously placed marker.
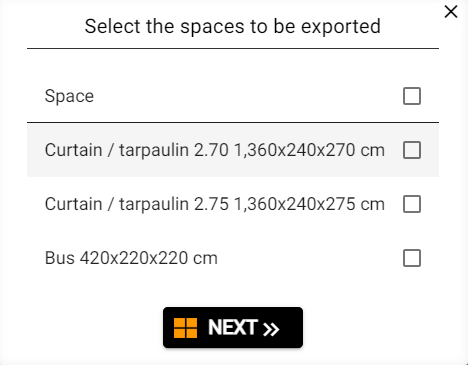
5. In the case of multiple cargo spaces in one project, you can download a visualization with all spaces visible in one file. After clicking "Export project" select "Space" if you want to download all spaces or select selected ones and then click "Next" . Now the file with the finished visualization and data is ready for download or sharing, as in the previous point.
➡ ADDITIONAL FUNCTIONS
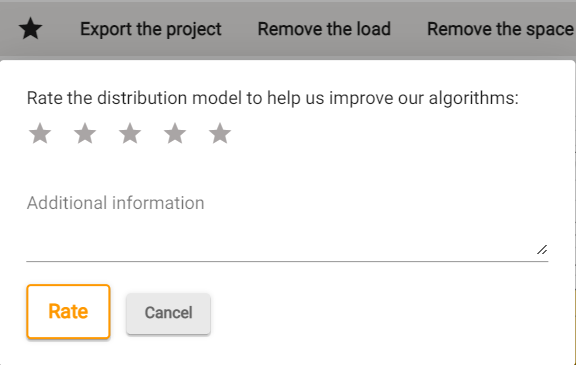
1. By clicking on the star in the upper right corner, you can rate the application with stars and leave your comments below.
2. If you are adding multiple spaces in one project, you can move between them by clicking the marked arrows.
3. If the entire load does not fit on any of the available vehicles - the program will suggest vehicles that will optimally transport the goods. In this situation, click "Suggest vehicles"
4. Cancel function - when entering large amounts of loads, the application sometimes needs time to optimally distribute the loads. If the waiting time is too long for you or you made a mistake while adding loads, you can now cancel this placement.
5. After enabling some features, filters will be displayed in the upper right corner of the screen. To hide them, click "Hide active filters".

Quick access to the cargo space settings - by clicking on the visible filters, you can go to the cargo space settings in an even faster way.
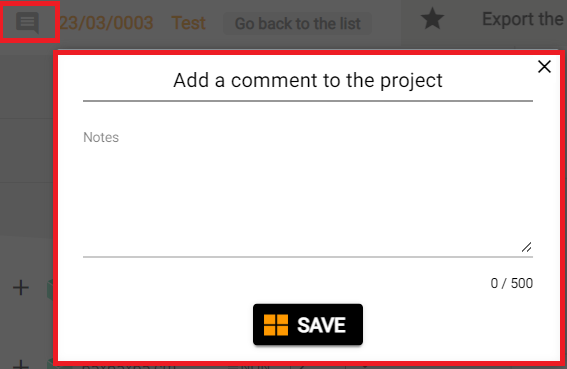
6. Add a comment to the project - if you need to add a comment for co-workers, click the cloud symbol and then place your content. The comment will also be visible when exporting and printing the project.
7. Undo  (in the lower right corner of the screen after making a change) - a function that allows you to go back to three settings. Before returning
  to the previous settings.
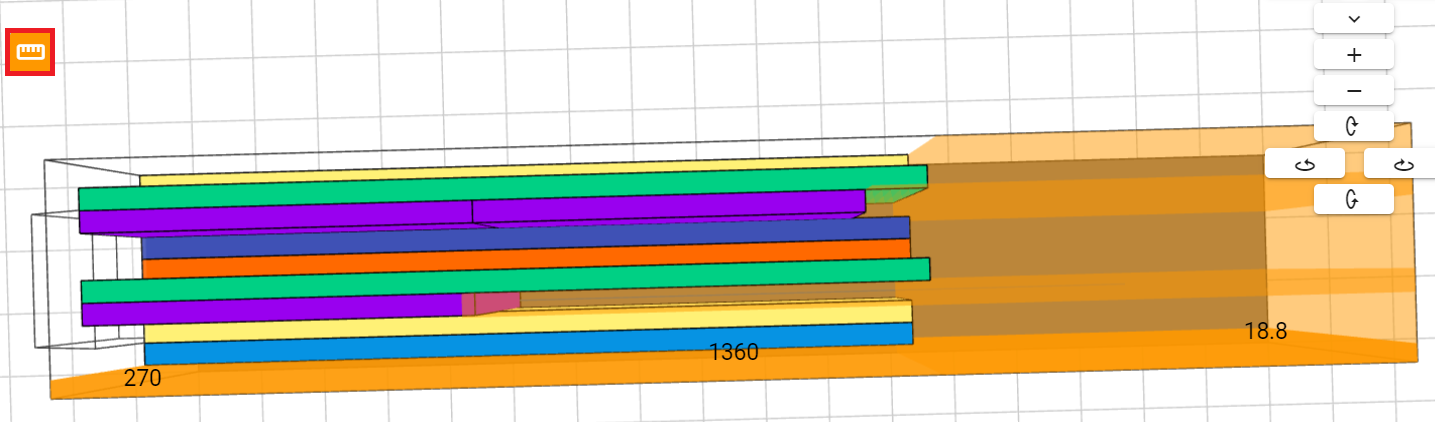
8. Option to measure how much free space is left  - a very useful function thanks to which the user can measure the free space left in the selected place.
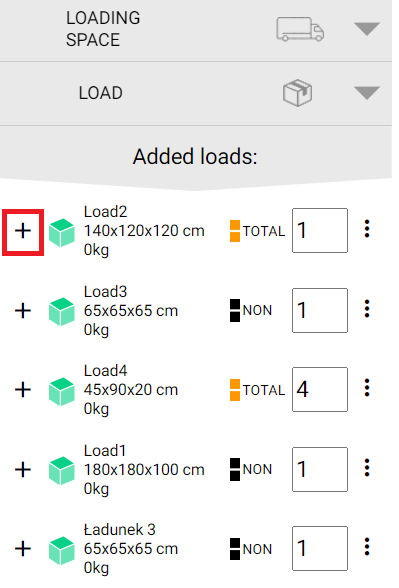
9. Grouping of elements, selecting many at once and changing their parameters on the visualization - using the CTRL key and the left mouse button, select the appropriate load on the visualization or the option to edit the parameters of the loads on the list of added elements using "+ ".
10. The grid function enables precise placement of non-standard loads, e.g. walls. Thanks to this, you can determine the distances from other loads with great accuracy. In addition, the project will be more readable if you need to accurately determine the location of loads.
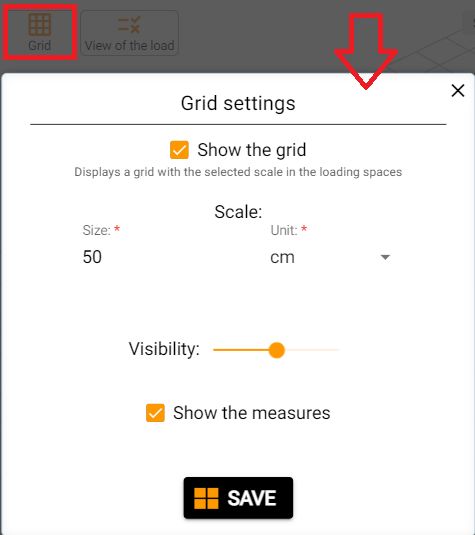
Click on "Mesh" , then set its parameters in the modal window. Check “Show mesh” to display it on the visualization. Then specify its size (you can also change the units). Set the visibility of the loads with the slider. You can also set its visibility. Remember to save your changes.
11. Quick return to the list of projects using the "Back to list" button .
12. Application language selection (PL, EN, ES, DE).
13. Option to add your own logo, which will be visible when exporting the project.
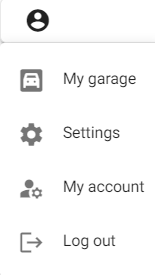
➡ USER PANEL
The place where you will find the options: "My Garage", "Settings", "My Account", "Log Out" .
1. “My Garage” is a place where you can store saved load distributions in cargo spaces before using the “Save Template” button (when exporting the project).
2. "Settings" → "Units and appearance" here you can specify which units you want to use. In addition, using the sliders, you can set the visibility of the load borders and the visibility of the load walls (i.e. the intensity of colors).
3. You can also download XLS reports for multiple bays. Click on the user panel, then settings and "XLS reports" and download.
4. "Settings" → "Project features" here you can determine whether:
● The list of own loads is to be shared between projects - enable so that previously added own loads appear in each project.
● The list of custom spaces is to be shared between projects - enable so that previously defined spaces are also visible in other projects.
● Defining a new load should immediately place it on the vehicle - turn it on if you want it to immediately appear on the visualization after defining the load.
● Automatic filling of the empty space after removing the load.
5. "My Account" - transfers the user to his account.
6. "Log out" - to exit the program.
➡ PAYMENTS AND ADDITIONAL FURTHER USERS TO THE ACCOUNT
New users can use all the features of the application for free for the first month after registration. After this time, you must make a payment to use the application.
1. To make a payment, log in to the application.
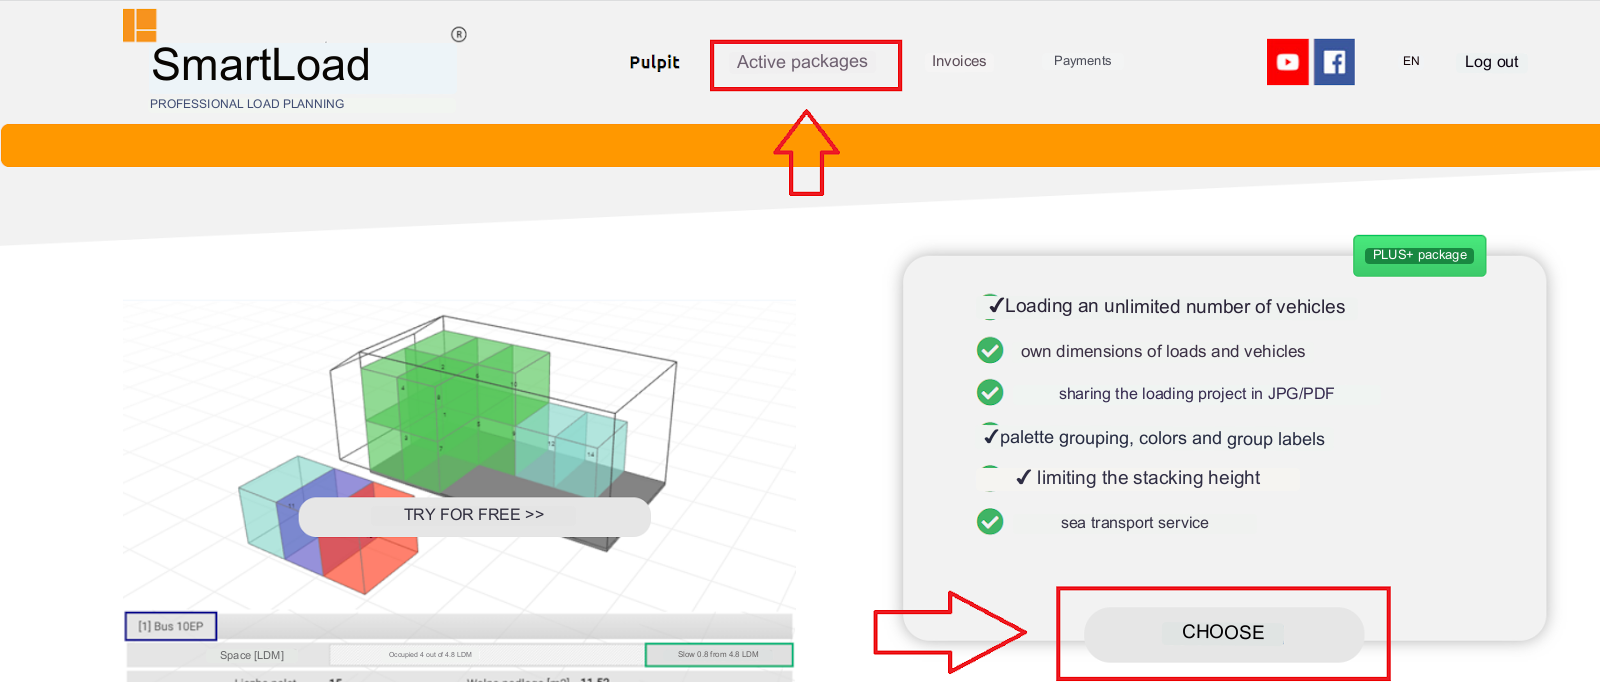
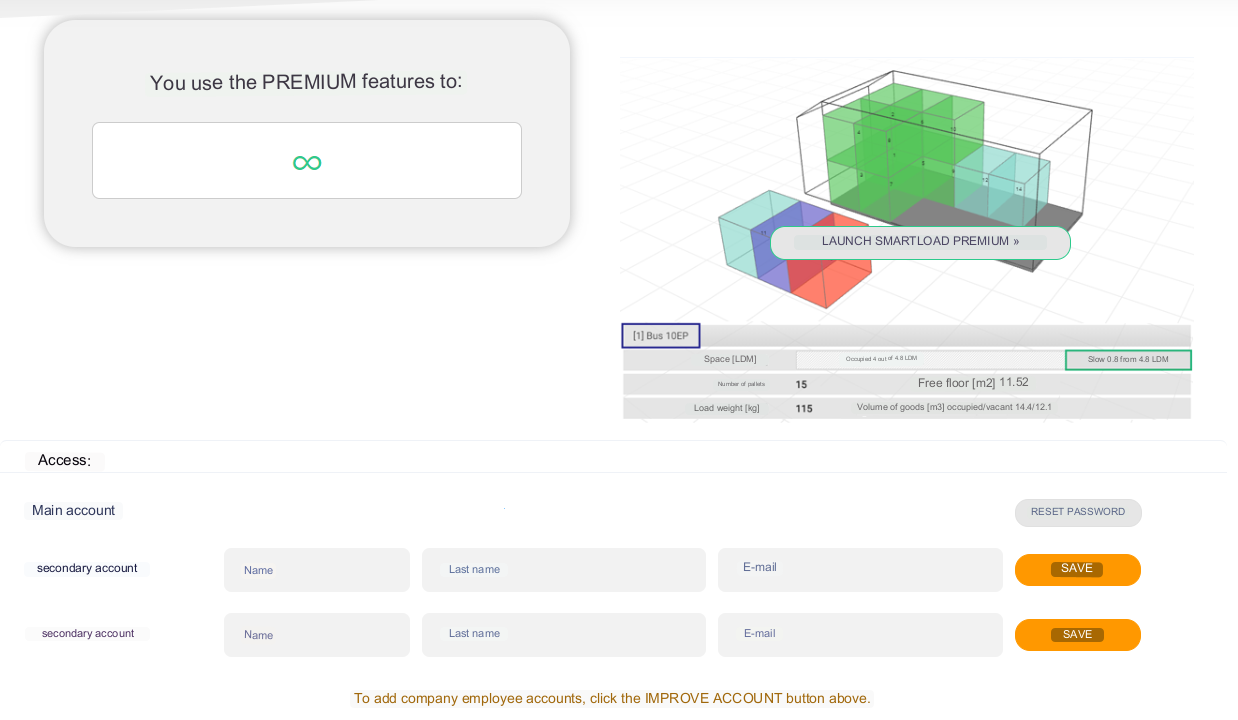
2. Then click "Select" or enter "Active packages" . Choosing the second option, the page will redirect you to the view below, to buy a premium package, click "Upgrade Account" .

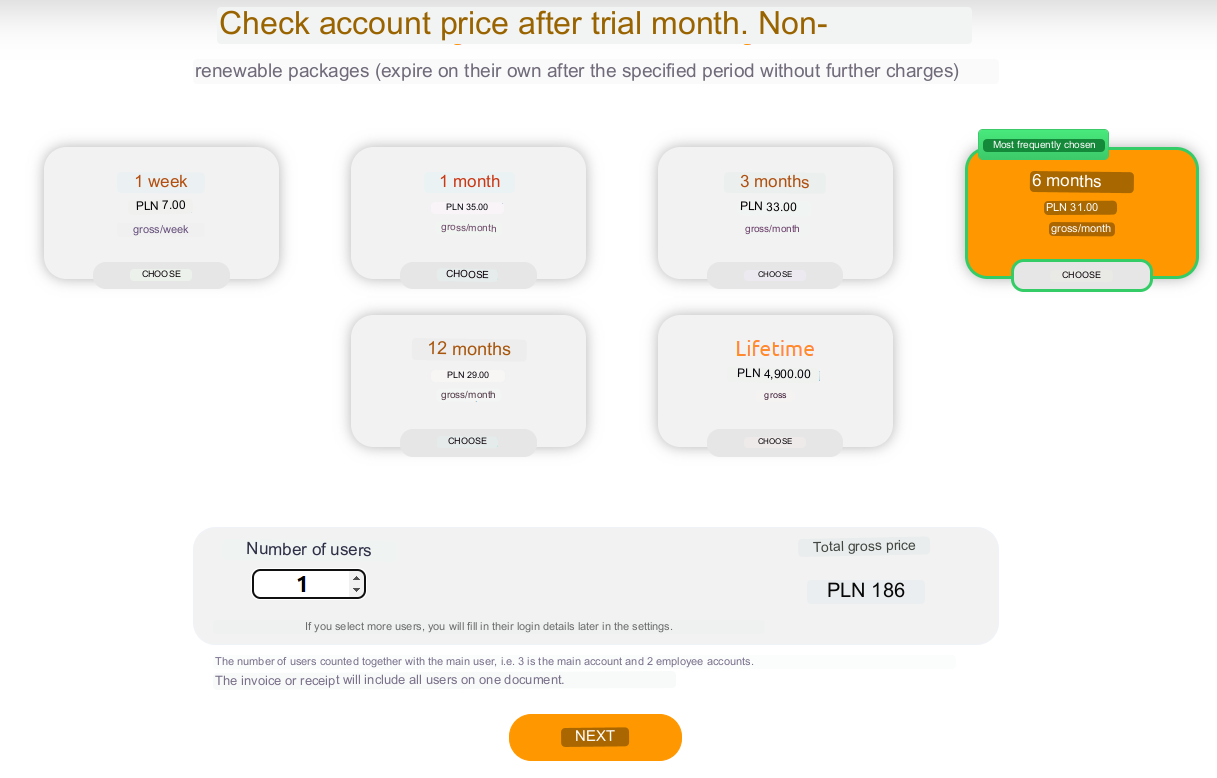
3. Then select the subscription package you are interested in. Choose from an annual, semi-annual, quarterly, monthly or weekly subscription. You can also choose a package for several users. By entering the number of people in the box below, the amount to be paid for more users is automatically calculated (the discount is included - the more people, the better the price).
4. You can choose a company invoice, receive a personal invoice or a receipt. Below you can proceed to payment or download the proforma.
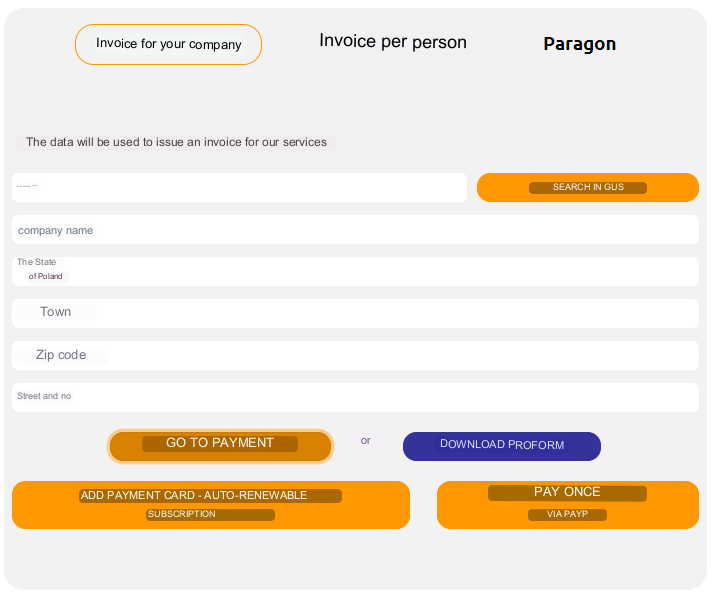
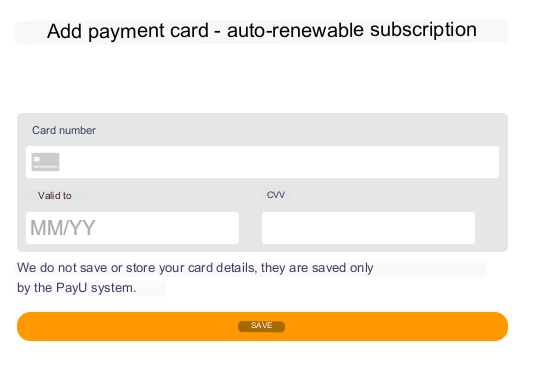
5. By selecting "Adding a payment card" an auto-renewable subscription will take place.
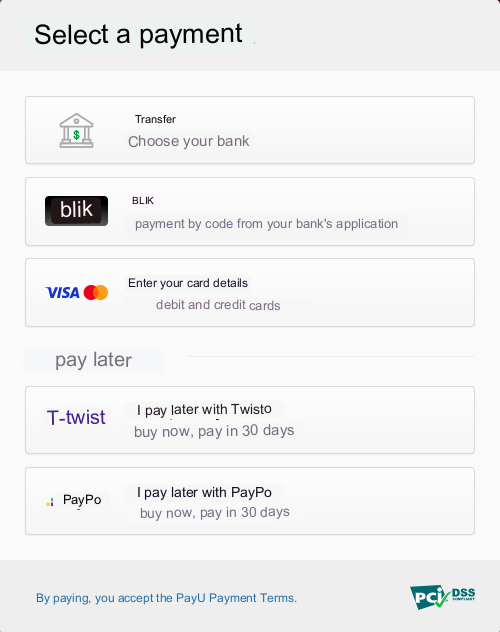
6. You can also choose a one-time payment via PayU, which you can make using a traditional transfer, using the BLIK code or entering your debit or credit card details. Thanks to this option, you will only pay for the selected period (subscription will not be auto-renewing). You can also choose deferred payment.
7. If you pay for more than one account, add additional user accounts by entering the data below and clicking save. Additional users will receive a request to verify their account at the address provided earlier. After verification, the additional user can set their own password.